Tonight I am excited to share a recipe for one of my favorite things to eat, Philly Cheesesteak! As usual this recipe is very easy to make and is SO Good!
What you will need:
2 lbs of eye of round steak, thinly sliced
1 green bell pepper, sliced
1 red bell pepper, sliced
1 medium yellow onion, sliced
1/2 tsp crushed red pepper flakes
1/2 tsp mustard powder
1/2 tsp chili powder
8-10 slices of provolone cheese
4-5 submarine rolls
optional: cheese wiz and oregano
Set your oven to 350 degrees. In a large skillet saute the peppers and onion for about three minutes. Add the meat and seasonings and cook until the meat is done. Then cut the rolls in half and butter one side of the bun, place the meat mixture on the other side of the bun and put the cheese on top. At this point you can sprinkle some oregano on top of the sandwich or not it is up to you, but trust me you should it is great! Then put in the oven to melt the cheese and enjoy! Now in Philly they put cheese wiz on top, now I don't like it but my mother in law loves it! This is seriously one of my favorite things to eat and I hope you enjoy it! :)
Happy Crafting!
Welcome. We hope that this blog will be a great place to find: paper crafting ideas, super deals on scrapbook supplies, and exciting monthly giveaways. Come back often to find out about new products and promotions. Happy Crafting.
Pages
▼
Tuesday, April 23, 2013
Freestyle Page Layout
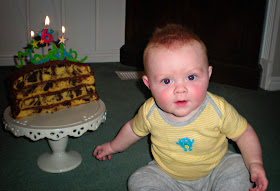
I hope everyone had a wonderful weekend and is hopefully sharing the joy of having warmer weather! I even went out today and bought shorts for my baby to get ready for summer! First I wanted all of you to share in my excitement, my baby turned six month old yesterday! I can not believe it, it feels like just last week I was bringing the little bundle home. Yesterday we decided to have a little "half" birthday party for him with half a cake. I even let him try a little lick of the frosting, he loved it! Now he is sitting up, trying to crawl, and his first tooth just broke through! Motherhood is indeed amazing.
Now for the second bit of good news, we are excited to share this new layout idea from Karen. She does such amazing work and I hope to see more from her soon! This layout if from our Teresa Collins Freestyle kit. It is a $24 value and we are selling it for the low low price of $4.99!! Amazing!
I hope you enjoy this page layout and again hopefully we will see more ideas from her soon! I hope we will see from me soon as well. ;) Check back later tonight for an all new Tasty Tuesday!
Happy crafting!
Tuesday, April 16, 2013
Tasty Tuesday Hambuger Mushroom Gravy
With all this dreary, cuddle up rainy weather we have been having here in Utah, I wanted to share a comfort food from my childhood with you. I know that my mother cooked for me growing up, but for some reason I can't remember very many of the dishes! Don't get me wrong, my mother is a wonderful cook and taught me how to cook - I just have a terrible memory. This dish is one of the few that I remember...and love! This Hamburger Mushroom Gravy is creamy, delicious and one of the easiest things you will ever cook!
What you will need:
1Tbs olive oil
1 small red onion
(or any onion of your choosing)
1 lb hamburger
2 Tbs flour
1/4 c milk
1 8oz can of mushrooms
1 can cream of mushroom soup
Start with the olive oil and onion in a large skillet. Cook on high for about 3 minutes, just until they start getting soft. Then, add your hamburger and brown. When the hamburger is done sprinkle on the flour and mix. Next, add the milk, cream of mushroom, and the mushrooms (don't drain the water out of the can, add it to the pan as well). Then just mix up until well combined and heated through. Serve on top of mashed potatoes with a side of veggies, it's as easy as that!! I have never tried it but I am sure it would also be good over pasta. I hope it warms you up like it did for me, enjoy!
Happy Crafting!
Wednesday, April 10, 2013
Pebbles Family Ties
We are very excited to share page and card ideas for the Pebbles Family Ties line by our very own Karen that works for us in our warehouse! This line is brand new and will be 30% off of our already low prices all day today!
She did such a great job on these and hopefully we will see more from her soon. Love all these ideas. Hope this helps inspire you all!
Happy Crafting!
She did such a great job on these and hopefully we will see more from her soon. Love all these ideas. Hope this helps inspire you all!
Happy Crafting!
Tuesday, April 9, 2013
Tasty Tuesday Broccoli Salad
We are so thankful for all the views and followers we have been gaining since I have taken over this little blog here. We hope that we can get to be better and bigger and share crafty and tasty inspiration for you! And now it's time for a another Tasty Tuesday! This week I wanted to share a family favorite, Broccoli Salad.
What you will need:
1 head of broccoli chopped
1/2 C. crasins
1/2 C. sugar
1/2 C. Light Mayo
1/2 C slivered almonds
1 Tbs. diced red onion
1 Tbs. rice vinegar
Combine everything in a bowl and stir until well combined, easy as that!! You can serve right away or even let it sit overnight and let the flavors really meld together. Either way is just great and it is a light delicious salad that everyone will love! Enjoy!
Happy Crafting!
Monday, April 8, 2013
Pom Pom Tutorial and Giveaway Winner
Wow!! We had such a great response on this months Giveaway! I loved reading all of your comments, and it just made me even more excited to be a mother and to be able to watch my children grow. There are just so many things to be grateful for about children young and old and what a great line we have to celebrate those little ones! Our lucky giveaway winner this month is Angela L. Congratulations! Please email us your address to allscrapbooksteals@gmail.com to redeem your prize.
I am finally feeling better - thank goodness! So, now for the DIY Pom Pom tutorial I have been promising! What you will need is: about 8-10 sheets of tissue paper (10 is better but 8 will work just fine), pipe cleaners, ribbon or twine, and scissors. What you do is layer the tissue paper on top of each other as best as you can (it wont be perfect, I tried) and start folding about 1 1/2-2 inch strips accordion style until you've folded it all the way down. Then, tightly put a pipe cleaner around the middle to secure it, and attach the twine or ribbon you will be using to hang it to the pipe cleaner. Then cut each end of the tissue so it has rounded edges. Then carefully start separating the tissue paper from each other until you get a big round pom pom. It is as easy as that!
I also went to a party once that used news paper to make these pom poms and it was a very cute vintage looking touch to the party! You can also cut the tissue paper so it isn't a full sheet to make smaller ones. Just note: It is harder the pull the tissue paper apart the smaller it is!
Be sure to check back tomorrow for an all new Tasty Tuesday!
Happy Crafting!
Tuesday, April 2, 2013
April Giveaway
I'm so sorry I have been absent and that I haven't posted the tutorial about the pom poms yet! I have been very sick the past few days and am still trying to get better. But I wanted to announce this months giveaway and let you know that more fun crafts and tasty treats will be returning soon!
Being a new mother, I am very excited to use these adorable new lines from My Minds Eye. They definitely capture the essence of little boys and girls! These brand new lines are being featured all week at 25% off!
For this giveaway one lucky winner will receive both of these collection packs! To win this giveaway all you have to do is comment below what your favorite thing is about your little boy or girl. My little boy is five months old now and my favorite thing about him is seeing him learn how to use his face and all the funny faces he learning to pull, and he has the most wonderful smile!
As always make sure to check back at the end of the week to see is you are our lucky winner!!
Happy Crafting!