One of our favorite things at Allscrapbooksteals.com is our Lobby. We love to decorate the cabinet and put out all the new products on display in our Lobby for the upcoming season. One of the quickest design tricks that we use is Washi Tape. We can change between Seasons and holidays but it just doesn't stand out until we add Washi tape. It is amazing how fast Washi Tape changes the mood and really makes our decor pop. It is easy and simple to put on. You unroll, stick the washi tape where you want it to go, smooth it out and it stays stuck. Then, when we want to change it out it peels right off. No mess and it is ready for the next season of Washi Tape. With so many designs available from so many different companies, we are never at a loss as what to pick. Try your favorite Washi Tape on something you want to stand out. Check out all of the selections of Washi Tape at Allscrapbooksteals.com. Happy Crafting!!! Jacqueline
Welcome. We hope that this blog will be a great place to find: paper crafting ideas, super deals on scrapbook supplies, and exciting monthly giveaways. Come back often to find out about new products and promotions. Happy Crafting.
Showing posts with label home decorating. Show all posts
Thursday, September 3, 2015
Sunday, July 19, 2015
Say Cheese II Blocks
You know how much we at Allscrapbooksteals.com love these wood blocks. So many of the companies make paper that works perfectly with our 4.5x4.5 blocks. These blocks are AMAZING!!! Not only are they a little bit bigger to allow for a border on these 4x4 squares of paper, but there is NO SANDING needed. They are ready to go. We thought we would share one of our block kits with you. This block kit comes from one of our favorite Simple Stories lines, "Say Cheese II". The gold foil helps make these blocks super impressive. Check out these Say Cheese II blocks today at Allscrapbooksteals.com. Happy Crafting!!! Jacqueline
Sunday, September 1, 2013
Doodlebug Halloween Parade
I'm oh so excited that Fall is really almost here! Football Starts next week and it is now officially less than two months away from my favorite holiday, Halloween. And only a month until I can decorate for Halloween, eeek! I am all about the creepy and everything scary for this wonderful holiday but, now having a child I can more fully appreciate the cuter side of Halloween and Doodlebug's new line is simply perfect.
Introducing Doodlebug's Halloween Parade! All of these adorable ideas below are from Doodlebug's Blog. They always have the greatest ideas on there, I highly recommend checking it out. There were so many to choose from to share, but a narrowed it down to my favorites. And even better, we will have it for 25% off all week long.


On another note I am thinking of putting out a Tasty Tuesday cookbook. I would need to compile more recipes and it will take a bit, but i was wondering if any of you would be interested in purchasing it? Let me know your thoughts :)
Happy Crafting!
Introducing Doodlebug's Halloween Parade! All of these adorable ideas below are from Doodlebug's Blog. They always have the greatest ideas on there, I highly recommend checking it out. There were so many to choose from to share, but a narrowed it down to my favorites. And even better, we will have it for 25% off all week long.


On another note I am thinking of putting out a Tasty Tuesday cookbook. I would need to compile more recipes and it will take a bit, but i was wondering if any of you would be interested in purchasing it? Let me know your thoughts :)
Happy Crafting!
Thursday, March 28, 2013
Easter Centerpiece
Today I walked outside and was pleasantly surprised at the beautiful weather. A 65 degree day, in March, in Utah is indeed a wonderful Spring day! I was very excited to start my Easter centerpiece project to welcome this beautiful Spring and the Easter holiday. This is what I came up with!


The paper, stickers, and twine I used are from the Doodlebug Take Note line. This project was very easy to throw together! I'm no usually a fan a fake flowers but these adorable polka dot Gerber Daisies just jumped out at me and I love all of the bright colors of the flowers and paper together. I also made these pom poms and will be making more for yard decor and I will post a tutorial about them on Friday!
The paper inside the tall Mason Jar is 4 1/8 x12. I just rolled it up to fit inside the top and let it just sit how it unrolled. Then I added some special touches to the outside of each jar with burlap, twine, more paper, and/or stickers! I also put paper on top of the small jar with the lid on it just by tracing the lid and cutting it out by hand. The best part about this project, you can make it all your own with whatever flowers or paper you want to use!
I am very excited to show off this piece when the whole family comes over this weekend for Easter activities! I hope you all have a wonderful Easter holiday as well.
Happy Crafting!


The paper, stickers, and twine I used are from the Doodlebug Take Note line. This project was very easy to throw together! I'm no usually a fan a fake flowers but these adorable polka dot Gerber Daisies just jumped out at me and I love all of the bright colors of the flowers and paper together. I also made these pom poms and will be making more for yard decor and I will post a tutorial about them on Friday!
The paper inside the tall Mason Jar is 4 1/8 x12. I just rolled it up to fit inside the top and let it just sit how it unrolled. Then I added some special touches to the outside of each jar with burlap, twine, more paper, and/or stickers! I also put paper on top of the small jar with the lid on it just by tracing the lid and cutting it out by hand. The best part about this project, you can make it all your own with whatever flowers or paper you want to use!
I am very excited to show off this piece when the whole family comes over this weekend for Easter activities! I hope you all have a wonderful Easter holiday as well.
Happy Crafting!
Saturday, January 12, 2013
Wrapping Up Your Sweets
Today is the first of many Valentines Day craft blog posts. I just absolutely love Valentines Day! I'm not even really sure why I love it so much. I was usually between boyfriends on valentines day growing up and it just recently became good now that I have a husband, but it has always been one of my favorites. Maybe it is all the fun happy colors, hearts, love birds, Valentines Day boxes, getting Valentines from friends and of course, chocolate! Lets be honest, this holiday is really all about getting and giving chocolate. So for this post I want to share some fun, crafty ideas on how to dress up your chocolate bars.
For these crafts, I used the new Echo Parks Love Story and Doodlebug Designs Inc. Love Birds. Both of these lines have been so fun to use and are very easy to use together - which I love! There will be more crafts to come that use these lines as well.


As you can see, these are very simple to make. Simply measure the candy bar, wrap the pattern paper around it, and decorate to your hearts content with all of the accessory stickers, chipboard shapes, and pops that these lines provide. With all of the different product you have when these two lines are combined, the possibilities are endless!

Have fun and stay tuned for more Valentines Day crafts soon!

Happy Crafting
P.S.
I still haven't recieved any of the winners addresses to send them their prize! Please be sure to email me at chefsinda@hotmail.com to redeem your prize!!
For these crafts, I used the new Echo Parks Love Story and Doodlebug Designs Inc. Love Birds. Both of these lines have been so fun to use and are very easy to use together - which I love! There will be more crafts to come that use these lines as well.


As you can see, these are very simple to make. Simply measure the candy bar, wrap the pattern paper around it, and decorate to your hearts content with all of the accessory stickers, chipboard shapes, and pops that these lines provide. With all of the different product you have when these two lines are combined, the possibilities are endless!

Have fun and stay tuned for more Valentines Day crafts soon!

Happy Crafting
P.S.
I still haven't recieved any of the winners addresses to send them their prize! Please be sure to email me at chefsinda@hotmail.com to redeem your prize!!
Sunday, December 30, 2012
New Years Eve Poppers
I can't believe this year is almost over! It has been such a great one for my family and me with our new little addtion!
Now to the crafts! I hope you kept those left over wrapping paper rolls like I mentioned before! (You could also use toilet paper rolls if you have those handy.) So, as you can see here, I made some homemade poppers for New Years Eve. All you need are some rolls, tissue paper, candy or confetti, twine, paper and embellishments!
I started out by cutting the rolls to the size I wanted them to be, they can be as long or as short as you want them. Next, fill them with candy and/or confetti, roll them up in the tissue paper, and tie off the ends with some WeR Glitter Sew Easy Glitter Floss.
Now for the fun part...decorating! For this project I chose the Authentique Peaceful paper line. I just love the old fashioned look of it, and the golds in it are perfect for New Years Eve. I also used Doodle Bugs Glitter paper – you can never have enough glitter when it comes to New Years! For some embellishments, I used Martha Stewart's Layered Doilies, Teresa Collins Everyday Moments Trinkets, and made some of my own Rosettes with our Epic Tool.
Helpful hint: If you are using glitter paper to wrap around you will probably need to use some tacky glue to keep it together. After putting on tacky glue cut another roll and put it around it and secure it with a rubber band to dry!
You could also use these cute poppers just as decoration to use year after year, because they are just so pretty! I've also made a cute popcorn style box for a treat/candy box. I used the Epic Tool again to make some Mini Popcorn Boxes and put all sorts of candy in them to munch on all night.
I hope you enjoy making this project as much as I did and I hope everyone has the best of New Years!! See you NEXT YEAR!
Happy Crafting!
Now to the crafts! I hope you kept those left over wrapping paper rolls like I mentioned before! (You could also use toilet paper rolls if you have those handy.) So, as you can see here, I made some homemade poppers for New Years Eve. All you need are some rolls, tissue paper, candy or confetti, twine, paper and embellishments!
Now for the fun part...decorating! For this project I chose the Authentique Peaceful paper line. I just love the old fashioned look of it, and the golds in it are perfect for New Years Eve. I also used Doodle Bugs Glitter paper – you can never have enough glitter when it comes to New Years! For some embellishments, I used Martha Stewart's Layered Doilies, Teresa Collins Everyday Moments Trinkets, and made some of my own Rosettes with our Epic Tool.
You could also use these cute poppers just as decoration to use year after year, because they are just so pretty! I've also made a cute popcorn style box for a treat/candy box. I used the Epic Tool again to make some Mini Popcorn Boxes and put all sorts of candy in them to munch on all night.
I hope you enjoy making this project as much as I did and I hope everyone has the best of New Years!! See you NEXT YEAR!
Happy Crafting!
Tuesday, December 4, 2012
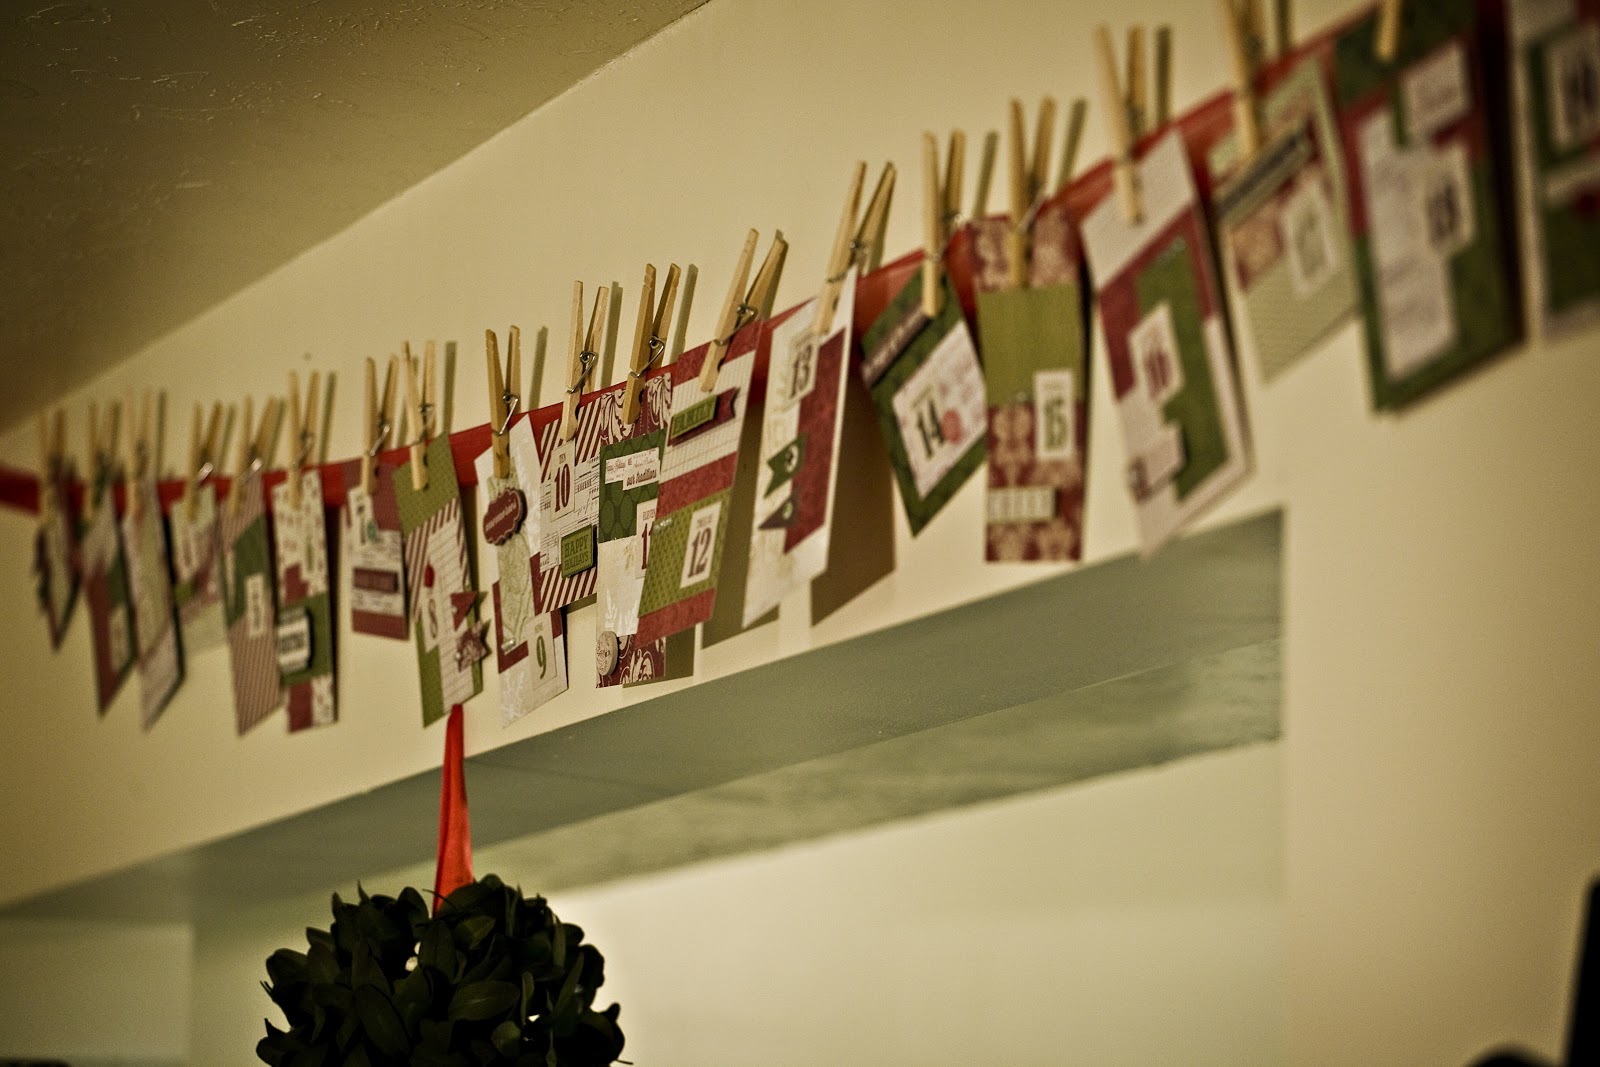
Teresa Collins: Christmas Cottage Advent Calendar
Hey y'all, Sinda here! It has been quite a long time since I last posted and I will now be taking over our Blog! Be sure to stay tuned for fun crafts, good steals, and a special Tasty Tuesday every week!
We have a new Teresa Collins Christmas line this year called Christmas Cottage, it is fantastic! I just can't get enough of Teresa Collins product, I love everything she designs. This year I decided to make an advent calender to count down to Christmas and make sure I stay in the Christmas spirit all season long. Each day my husband and I will read a scripture passage about Christ, and on a few days through the month we will do a fun Christmas activity. Some of the activities we will be doing are making treats for our neighbors, watching Christmas movies, making coco and sleeping under the stars (the Christmas tree), going to Temple square to see the lights and on Christmas day going to see Les Miserables!
For this project I used the TC Christmas Cottage Collection Pack, Trim, and Buttons. I loved all the paper and embellishments and how well it all went together. I cut various size cards out of the paper and layered it with bits and pieces of the rest of the paper. I then embellished it with the buttons and the accessory sheet from the pack. I really like to use pop dots to get things stand out and catch your eye and I finished up with some DB Lilly White Bling. So simple and it all came together in about an hour.
I sure love this time of year and the kind spirit that is all around, and of course all of the fun crafts! I hope you find inspiration in the projects that I share with you and that you will keep checking back for more. Happy Crafting!
We have a new Teresa Collins Christmas line this year called Christmas Cottage, it is fantastic! I just can't get enough of Teresa Collins product, I love everything she designs. This year I decided to make an advent calender to count down to Christmas and make sure I stay in the Christmas spirit all season long. Each day my husband and I will read a scripture passage about Christ, and on a few days through the month we will do a fun Christmas activity. Some of the activities we will be doing are making treats for our neighbors, watching Christmas movies, making coco and sleeping under the stars (the Christmas tree), going to Temple square to see the lights and on Christmas day going to see Les Miserables!
For this project I used the TC Christmas Cottage Collection Pack, Trim, and Buttons. I loved all the paper and embellishments and how well it all went together. I cut various size cards out of the paper and layered it with bits and pieces of the rest of the paper. I then embellished it with the buttons and the accessory sheet from the pack. I really like to use pop dots to get things stand out and catch your eye and I finished up with some DB Lilly White Bling. So simple and it all came together in about an hour.
I sure love this time of year and the kind spirit that is all around, and of course all of the fun crafts! I hope you find inspiration in the projects that I share with you and that you will keep checking back for more. Happy Crafting!
Monday, October 11, 2010
Spooky Fireplace Mantel
Have you seen this hauntingly adorable fireplace mantel by Amber Packer? I love the decoupaged pumpkin on a candlestick. You can find complete instructions for how to create your own spooky mantel here. You can find My Minds Eye's Haunted line for 40% off this week over at All Scrapbook Steals. Happy Crafting.
Tuesday, October 5, 2010
Doodlebug Halloween House
I am not a fan of scary Halloween decorations. I am drawn much more to cute, kid friendly things. That's why I love this darling Halloween house by Doodlebug designs. You can buy the plain white houses from All Scrapbook Steals for 50% off retail. They come flat, and you just pop them up and start decorating. These would be so cute using Doodlebug's line Spooky Town, or Echo Parks new Happy Halloween line, both available for 25% off. Happy Crafting.
My House at Halloween
Here's a little peek at some of my Halloween decorations for this year. Don't you adore the little raven with his "Nevermore" sign? I love clever home decor.
Wednesday, July 21, 2010
Map of America
I don't know about you, but I am starting to get excited for the kids to go back to school. My children head back in about three weeks. As much as I love the lazy days of summer, I've started to miss having a structured routine.
I try to come up with lots of fun, educational, projects we can work on during the summer so my kids don't forget everything they learned in school while they're on vacation. When I saw this map on Amber Packer's blog I thought it would be a perfect end of summer project. She used My Mind's Eye's So Sophie line of papers and I love the color combination. You can find complete instructions on how to make a map of your own on Amber's Blog. Happy Crafting.
Subscribe to:
Posts (Atom)